Friday 28 February 2014

Teaching myself "SFX" Makeup - Wounds


So I started getting a little bit more interested in the wonderful world of SFX makeup when I did the makeup for our student short film last year, and I'm doing it yet again this year. My tutor loves the current work I'm doing and has asked me to help out the first year degree students and give them a few pointers on makeup and come along to their TV production and do the makeup. I by no standard think I'm in a position to teach other people on makeup as I just don't have the experience, but I thought I would share some pieces I have done recently and talk you through the products I use.

Mehron liquid latex - The latex I use is this one  which is from amazon, I paint the product onto the skin and let it dry. When you apply the product to the skin it comes out an off white-yellow colour but it dries clear so that it blends into the skin. After adding a couple of layers and when it's completely dry I will make a cut in the middle of the latex and rip it to make a wound, this gives the effect of teared/ripped skin. This can be seen in picture 1 and 3. If you would like a step-by-step tutorial on how to do so let me know and I will get cracking on that.

Mehron rigid collidion - This product is used to create scarring, it's seriously amazing stuff you paint it on and it dries within 30 seconds and the more layers you build up the deeper the scar will look. This product is shown in the second image. You can also buy this on amazon here.

Mehron bruise wheel - The bruise wheel can be used in so many different ways, it's basically a circle palette of 5 bruise-like colours which are cream colour pigments, they create realistic looking bruises yet I also use the red/dark maroon/blue shade when I do wounds so it's not just limited to bruises as the red and dark maroon act as a great base base for the blood and help blend in the edges of the latex, all of the colours in the wheel are highly pigmented and blendable. I have always used a stippling brush and sponges to create the bruises but my lovely blogger friend Stephanie recommended that I use one of these stippling sponges which I am yet to try! The bruise wheel is available from amazon here.

Mehron Stage blood - I ordered this after reading great reviews that it's very realistic looking which I completely agree with. The colour is a darker red so it looks fresh and its sort of gloopy so you're not going to get those light red watery streaks of blood which doesn't look convincing! instead, depending on how you use it hangs in large droplets which does run slightly but it will dry a bit so it doesn't budge much, so it actually looks like droplets of blood. this is also made of corn syrup which tastes quite nice so it can be used around the mouth.

Others - Cotton buds, triangle sponges, scissors, tweezers, foundation brush and small detailer brush.

I really love just playing around with these products and trying to improve each time! I'm really glad I bought them a year ago as they have come in very handy with my media degree!

Tuesday 25 February 2014

Dr.Jart+ Regenerating beauty balm SPF 30


Excuse my scruffy appearance but some times you just need to throw your hair up and wear a baggy t-shirt. I've been slightly more confident in my skin lately and have been venturing into the land of BB creams. The Dr.jart regenerating BB cream is a moisturiser, sunscreen and treatment serum all rolled into one product, it claims to hide uneven skin tone to reduce the need for foundation and concealer.
My sister in law gave me this Dr.Jart Regenerating BB cream because she didn't like it after using it a couple of times so when she offered it to me I took it, yet I normally wear medium-full coverage foundations so this little tube scared me a little bit. When I tried this I was really surprised by the amount of coverage it offered, when I hear the words BB cream I think extremely light coverage but the Dr.Jart one is a light-medium coverage which is lovely. Dr.Jart claim: "This Dr Jart+ BB Cream provides strong coverage for redness and spots which won't rub off as easily as traditional cosmetics. Skin will look brighter, whilst still suitable for problem and sensitive skin."I completely agree with what they say, I feel as if my face has a certain glow to it after I apply it yet covers most imperfections on my skin.

After I have worn my foundation for a couple of hours I normally can't wait to get it off my face as it just feels disgusting, yet this BB cream feels so light on the skin that I forget i'm even wearing makeup and I have even started reaching for this over my other foundations. I think that this is going to be perfect for the summer time when you don't want to be caked in makeup as it  offers an SPF of 30 and has great coverage. The formula is thick to apply but you can't feel it once it's on the skin, I apply it with a Real techniques buffing brush it sort of stippling motions and blend out any areas that need to as I don't like the feel of applying products with my hands. This product is very long lasting and doesn't rub off patchy through out the day which I love. For me this product is my 'lazy day' base where I don't want to faff around as it's quick and easy to apply, I will repurchase it again yet probably only in the warmer months where I want a lighter base.

Saturday 22 February 2014

The laziest of days


So today has been one of those 'the day after the night before' kind of days where I do nothing but slob around so I thought I would share just how uninteresting my day has been. Last night I went out with some of my uni chums and I drank a little bit too much wine, so to keep the whole zombie look at bay I decided to put on a little bit of makeup. I've really gotten into wearing the Dr.Jart BB cream which is a tad odd for me considering i'm a full coverage kind of girl, so today has been a day for super simple makeup, nothing fancy going on! *Puts black and white filter on selfie to hide hideousness*, Over half term I rekindled my love for the sims 3 and decided to finally put it onto my mac and i've been obsessed, I wasn't going to reinstall all my expansion packs because I'm just waiting for the sims 4 but I caved - I'm not even sorry. Incase you're wondering why my sims house looks so bare it's because play without cheats because lets face it, if you use 'motherlode' then the game just gets boring, right? so that's literally all i'm doing today and i'm having bacon and lentil soup with garlic bread for dinner...  you all needed to know that piece of useless information!

Tuesday 18 February 2014

Bioderma Hydrabio Light Moisturising Cream 40ml


When browsing the Escentual sale back in early January I was looking for a new light moisturiser because mine just weren't that fabulous, to my surprise I found that they stocked Bioderma and got a little bit excited so I decided to pick up the Bioderma Hydrabio light moisturising cream (40ml) here which retails for £14. I can't quite remember how much of a discount I got off mine but Escentual often do some brilliant deals so be sure to keep an eye out for those! there are two variations of this product, the light cream which I have and the rich cream which can be found here, the rich cream is meant to be more hydrating and for dryer skin types, and the light cream is aimed at people with an oilier skin type. I don't particularly have oily skin but I can get a little bit shiny in my t-zone during the day and I don't like the feel of rich moisturisers on my skin all the time which is why I opted for the light variation. I apply this every morning after cleansing my skin and it sinks in extremely quickly, the product has a thin cream consistency and doesn't feel tacky on my skin. my skin feels plump and moisturised every time I use this and I liked that it's tailored for dehydrated skin, because there's a difference between dehydrated and dry skin so a thick moisturiser won't make a difference to dehydrated skin, just dry. now I can't tolerate highly fragranced moisturisers and this product has such a light, fresh smell that isn't offensive what-so-ever, it's really pleasant and you can't smell it once its on your skin. This product is aimed towards sensitive skin which mine can be sometimes and I have had no problems with it irritating my skin at all. I love that the packaging is hygienic and there's no dipping your fingers into pots and all of that nonsense, but whenever I go to dispense the product out of the pump it can shoot out so be aware of that and dispense it against your fingers and not from a bit of a distance. Overall, I really like this product yet have never stayed faithful to a moisturiser before so I may not repurchase this straight away but i'm pretty certain I will go back to it in the future, possibly in the summer time because that's when I feel it'll be the perfect day moisturiser.

Sunday 16 February 2014

What's in my makeup bag?


 So we're all a bit nosey and like to take a peek into other girls makeup bags, I'm always curious as to what makeup other girls use! So in my stash I have my makeup draw where a large majority of my makeup is kept and then I have my striped hello kitty makeup bag where I keep my everyday makeup. I like knowing I can just grab this makeup bag and have everything I need in there, and i'm far too lazy to rummage through my makeup draw everyday hunting for a certain blush or something along those lines, you know what I mean!

 First up I have the Maybelline babyskin instant pore eraser primer, this is great for concealing pores and it's easy to just pop this on everyday and not have to worry about wasting my benefit porefessional primer, which is my all time favourite primer! They are quite similar in texture and results, yet I do feel as if the benefit one is better. Next I have two foundations, which are the Nars sheer glow foundation and the Laura Mercier silk creme foundation, both of these are medium-full coverage and don't look cakey on my skin which is why I love them, they both have a semi-matte finish so ignore the whole 'sheer glow' part of the Nars foundations name! And what UK makeup bag would be complete without the collection lasting perfection concealer? everyone and their mum raves about this full coverage concealer, I don't think I could go a makeup day without using it alongside the Bobbi brown corrector which work beautifully together covering up my under eye circles! Now to set all of that liquidy goodness in place, I use the soap and glory one heck of a blot pressed powder and this is so 'finely milled' that you can't go OTT with it and look like you have been dunked in a bag of flower, I don't like the thought of touching my face and half of my foundation rubbing off with the contact. Because i'm severely lacking in the cheek bone department I have to fake having them with two products, the first one being benefit's hoola bronzer which I use for a general bronze up of my face and a light contour in the hollows of my "cheekbones" I then highlight the tops of my cheekbones, down the centre of my nose and my cupids bow with Mac MSF soft and gentle highlighter. My two blushers of choice are Mac well dressed and sleek flushed.

 My mac palette is the main attraction in this section, as it covers all over the lid colours (all that glitters, woodwinked), highlights (shroom), my crease and eyebrow choice which is mac's characoal brown... so you're probably wondering why I have the Anastasia brow wiz in my makeup bag if I use charcoal brown on my eyebrows, well I have it in these just for the spoolie it's such a neat little brush for your eyebrows I just couldn't bring myself to throw it away! For eyeshadow bases I have a sample of the benefit stay don't stray eyelid primer and mac bare study paint pot! Now if you know me you'll know i'm an eyeliner fiend, I love a good ol' winged liner and wear it 99.9% of the time so to create my feline flicks I use the maybelline gel eyeliner, and to make myself appear more awake I use the Rimmel kohl kajal in 'nude' on my waterline. To make my non existent eyelashes magically appear I'm currently using two mascaras which are the maybelline big eyes mascara which I really like and the L'oreal miss manga mascara which i'm not a huge fan of!
For just a plan old lip balm I use my EOS sweet mint lip balm which is the perfect lip balm, the mint cools down sore lips and hydrates them extremely well. For days where I want a glossy finish I use the Palmers cocoa butter formula dark chocolate and peppermint lip butter which smells so gorgeous and tastes sweet, this stuff melts into your lips like butter and I can't fault it. When I want a bit of colour on my lips but don't want to mess around with lipsticks I use my korres Jasmine lip butter which is buttery smooth and gives me a pinky nude tint to my lips. My new favourite everyday 'lipstick' choice is the revlon colourstay matte balm in elusive, which is a nude mid-tone pink which isn't too offensive for everyday wear and it lasts for hours!

What's in your everyday makeup bag?

Friday 14 February 2014

The perfect bedtime companions

These are my go-to products when I want to wake up fresh as a daisy, I follow this routine as often as I can as I love the results these products give me the next day. First up I massage the trilogy certified organic rosehip oil all over my face, I use this every night as It moisturises my skin beautifully and helps reduce scarring and other little nasties on my face, I've nearly ran out of it and desperately need to repurchase it. Next I add a layer of the origins drink up intensive overnight mask to my face, this stuff smells so gorgeous and I wake up with the softest skin after i've used it, and obviously you can't forget to moisturise your lips, I usually use the weleda skin food when I want them to be super smooth the next day, it doesn't feel heavy on your lips and sinks in lovely and I just love the fact it's in a tube and not a pot, is that weird? My hands can get extremely dry, like the sahara desert kinda dry so I love to slather my hands in a thick hand cream before bed and my favourite one is the body shops hemp hand cream, now this stuff smells kinda funky but it's so good for sorting out any dry skin on your hands so I can look past that minor detail! Finally I spray my pillows / wrists with the body shops deep sleep dreamy pillow mist, i've done a full review on this product here now this isn't a miracle product that makes you fall asleep instantly, I just feel as if this puts me into a deeper sleep and I wake up feeling more refreshed.

What are your favourite bedtime products?

Friday 7 February 2014

The body Shop deep sleep dreamy pillow and body mist

I've never been one of those people who can fall asleep once their head hits the pillow, like my boyfriend Aaron, give him two minutes and you'll hear him snoring away... me on the other hand? I'm not so lucky. When I was searching the body shop website during their 40% off I come across this product and read some brilliant reviews, I was a little bit skeptical about whether or not it would actually work, yet a lot of people said that it did and i've seen bloggers raving about the this works deep sleep range, so I thought I would try my luck considering it was on offer. I spray two spritzes of this on my pillow and a tiny bit on my wrists before I go to sleep, usually when I wake up whether it's from a nap, or i've slept through the whole night I feel groggy and grumpy and it's not a pretty sight but I find that when I wake up after using this I feel as if i've had a dare I say it a... deeper sleep! I feel more rested and less grumpy. Now, I was really expecting this to smell like lavender because lavender is known to be relaxing and calming, yet to me this smells exactly like the nuxe reve de miel lip balm, so a lot like honey? mixed in with a hint of lavender. Now you see, i'm not one for those kinda scents at all so I don't find it all that pleasant and I don't feel as if this product makes me fall asleep any quicker than normal, I do like waking up more refreshed on the other hand
Would I repurchase this product? I'm not sure... I want to compare it to the this works deep sleep range before to see if there's much difference.

Tuesday 4 February 2014

January favourites 2014 | VIDEO


So guys it's that time of the month again where it's time for january favourites roll around, I don't have too many this month but I hope you enjoy the video anyway! If there are any other videos you would like to see from me then definitely let me know, i'm going to be filming a 'what's in my makeup bag' video soon, when I get a bit of time off! I have all of the product names in the description box below the video so if you're looking for any product names, you'll find them there!


Sunday 2 February 2014

A bloggers guide to DSLR photography


So at the moment i'm getting a lot of questions asking what camera I use, I now use a canon 600D as of christmas thank you Aaron! but my first DSLR was a nikon D3000 which really is a beginners dslr, and I then went onto using the canon 500D, all of my blog photos taken before christmas I used this camera. I did photography A level and photographed a wedding two years ago and i'm currently doing a media degree where we use canon 550D's, so i've learnt quite a bit about these beautiful cameras. You by no means have to have a fancy camera to be a blogger, i've always been passionate about photography so i'm very interested in them and my DSLR's aren't just for blogging purposes, just to put that out there.
Geeky knowledge - did you know that DSLR stands for digital single lens reflex?


First up, ditch the auto setting! using manual mode will make such a difference to your photos as you are controlling the lighting in your photos. Auto mode will just 'balance' out the lighting and change all of the settings for you, if you're in a darkish room then this can make the shutter speed really slow and blur your images. Secondly, for blog photos I always photograph my images in 'live view mode' which is where you can see the viewfinder on the LCD screen, I do this because you can see the difference the aperture, iso and shutter speed make to your image, whereas when you're looking through the view finder you can't see any change until you've taken the photo. If you're using the canon 600D, to change into live view mode you simply push the 'record' button which you use on filming mode which is placed to the right of the view finder, do not fear this will not record anything if you're on manual mode, it'll simply just put the viewfinder onto the screen.

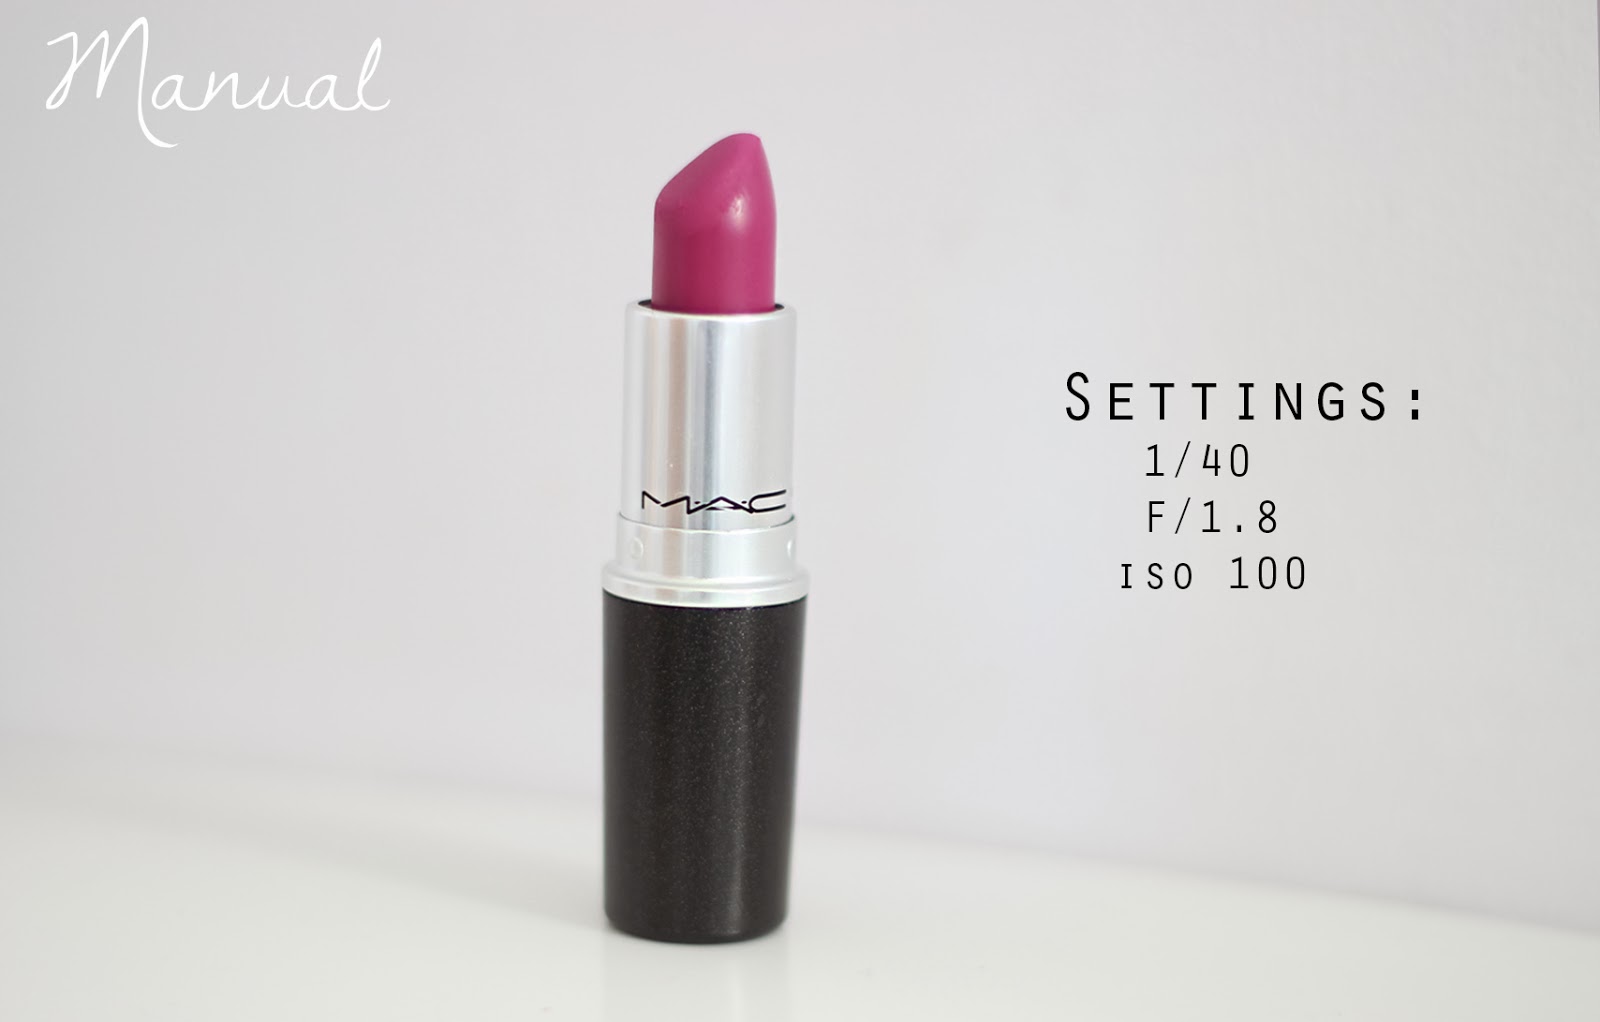
These photos are unedited apart from the writing


Changing the different settings in manual mode / tips and tricks


To change your camera into manual mode turn the dial to the 'M' setting.
Manual mode is made up of a triangle of three things - shutter speed, aperture and ISO and all of these can work together to create a well balanced image.

Aperture - F/stops - the one thing that stuck in my mind from A level is the saying "the smaller the number the bigger the hole" which is referring to the fact that the smaller F/stop you have the wider the lens will be open, therefore letting more light in and making your photos more exposed (lighter), for example my canon 50mm lens goes down to f/1.8, yet the standard canon 18-55mm lens which it comes with only goes down to f/3.5 so with the 50mm lens i'm able to gain more light into my photos in darker conditions. When you have a lower aperture this also gives you that beautiful deep depth of field (blurry background with an object in focus) to change the aperture on the Canon 600D (and 500D I think it's the same for all) you hold the AV +/- button and scroll the shutter speed at the same time and you should see it change on the screen.

Shutter speed - Shutter speed is how fast the cameras shutter opens and closes, so a fast shutter speed can capture action shots crisply, and a low shutter speed can capture 'motion blur' where you can see blurred movements. Never go below 1/25 if you're not on a tripod as this is the point where you can see camera shake and blur your photos, this is my biggest tip for shutter speed. Also the slower your shutter speed the lighter your photos will be because the lens is letting light hit the sensor for longer, so if you're taking photos and have a low aperture and wondering why your image is still dark try cranking down the shutter speed a tad.

ISO - this is how sensitive the sensor is to light, the Canon 600D's ISO ranges from 100 - 6400 and these can be used in different ways, for example iso 100 means that the sensor isn't very sensitive to light so you would use this is good lighting conditions for example a sunny day. Now, the higher the ISO the grainier the images will become so with ISO 1600 - 6400 they will be extremely grainy in comparison to ISO 100, yet it will be more sensitive to light so this is perfect for situations such as gig photography.When taking my blog photos, if I can't get them light enough at ISO 100 indoors I will always bring it up to around ISO 400 maximum, and this can make such a difference to how light your images are and because the ISO isn't extremely high the images won't be grainy. To change the ISO on the canon 600D there's a circular button behind the shutterspeed on top of the camera which says 'ISO' push this once and all your options will come onto the screen, you can then select which one you want to use by using the arrows < > and pressing 'set' (the little keypad on the back of the camera you use to scroll through photo's you've taken)

I picked up my canon 50mm f/1.8 lens here for £76.99 but it's 100% worth the money in my opinion and the lens I use to take all of my blog photos with. I have also just purchased these studio lamps for £76.88 but haven't tried them yet, I will be doing a post all about them when I get the chance to/when they arrive. I hope this post has actually helped some of you understand your DSLR's a little bit better, or if you're looking to buy one, make it seem a little less scary. I got my first one when I was 15 and i've never looked back, they are worth investing in if you love photography like myself. 
If you would like some editing tips, or other photography related posts please let me know what you would like to read and i'll cook something up!